In this tutorial we will create a simple Android app that applies the following techniques:
- Create JSON objects and arrays
- Store a “local” file for the app
- Read and write to the local file
- Define a custom ListView
- Convert JSON objects into a ListView
Download the source code for this project here.
Application Overview
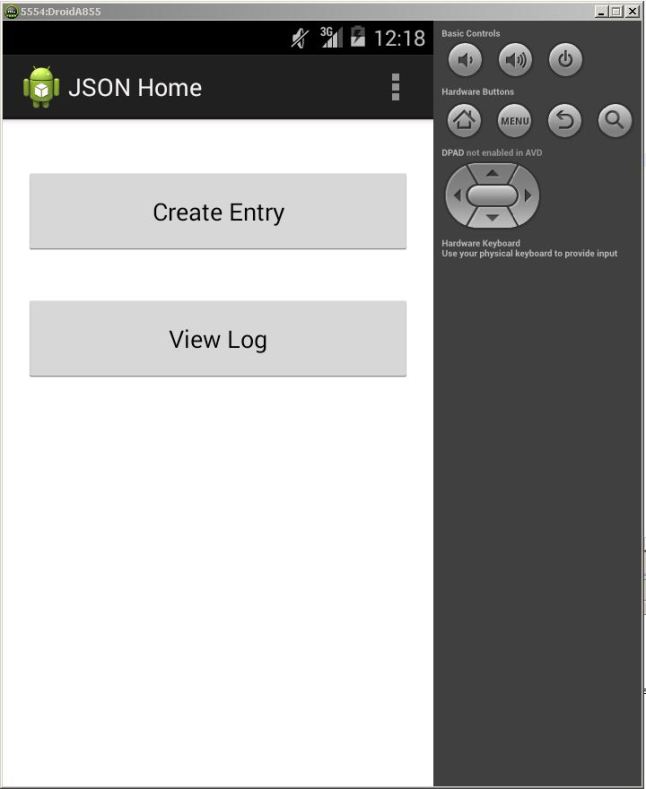
Here is a basic overview of this app:
- Home screen has two buttons, called “Create Entry” and “View Log”.
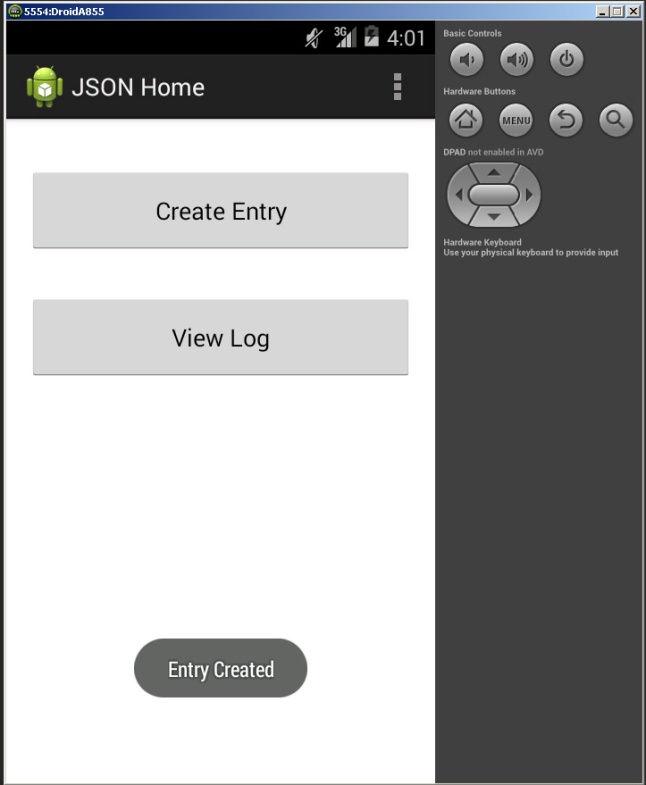
- When “Create Entry” is clicked a JSON object containing the current date, time, and description is created and stored in a JSON file which is stored locally on the device.
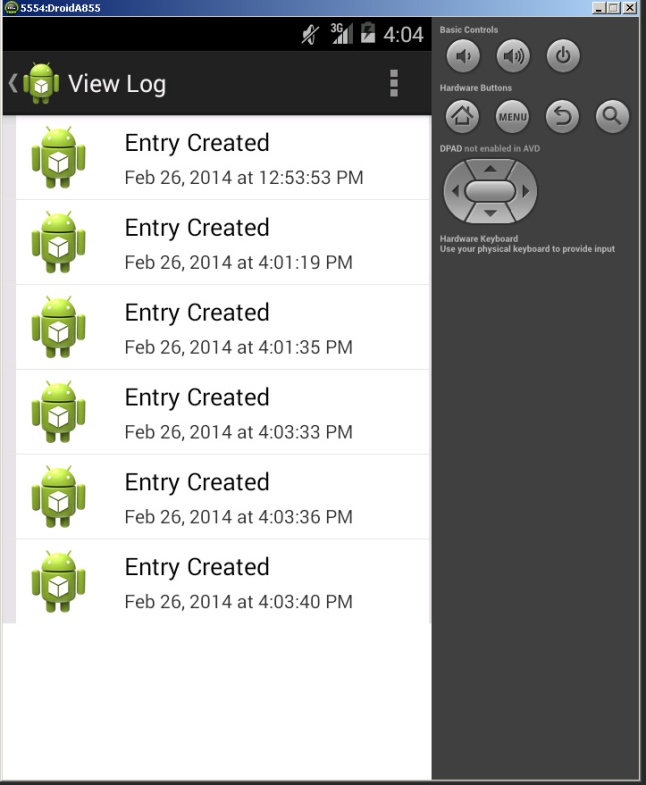
- When “View Log” is clicked a new activity starts that shows a custom ListView that has a row for each entry in the JSON file.
- As a bonus – a menu option will be created to clear all entries in the log file.
As you can see we’ve got a lot to do so let’s get started.
Layouts
The Home Screen Layout – activity_main.xml
<RelativeLayout xmlns:android="http://schemas.android.com/apk/res/android"
    xmlns:tools="http://schemas.android.com/tools"
    android:layout_width="match_parent"
    android:layout_height="match_parent"
    android:paddingBottom="@dimen/activity_vertical_margin"
    android:paddingLeft="@dimen/activity_horizontal_margin"
    android:paddingRight="@dimen/activity_horizontal_margin"
    android:paddingTop="@dimen/activity_vertical_margin"
    tools:context=".MainActivity" >

    <Button
        android:id="@+id/button_log"
        android:layout_width="fill_parent"
        android:layout_height="wrap_content"
        android:layout_alignParentTop="true"
        android:layout_marginTop="20dp"
        android:padding="20dp"
        android:onClick="clickListener"
        android:text="@string/log_button" />

    <Button
        android:id="@+id/button_view_log"
        android:layout_width="fill_parent"
        android:layout_height="wrap_content"
        android:layout_alignLeft="@+id/button_log"
        android:layout_below="@+id/button_log"
        android:layout_marginTop="30dp"
        android:padding="20dp"
        android:onClick="clickListener"
        android:text="@string/view_log" />

</RelativeLayout>
Note the onClick function called “clickListener”. I prefer to use the technique for handling button clicks. I’ll show the “clickListener” function in MainActivity.java
Next we’ll need an activity to view the JSON log as a listview. Create a new Android Activity for the log viewer. I called mine “activity_log.xml” It only needs an empty ListView.
The Layout for the ListView – activity_log.xml
<LinearLayout xmlns:android="http://schemas.android.com/apk/res/android"
    xmlns:tools="http://schemas.android.com/tools"
    android:id="@+id/LinearLayout1"
    android:layout_width="fill_parent"
    android:layout_height="match_parent"
    android:orientation="vertical"
    tools:context=".LogActivity" >

    <ListView
        android:id="@+id/logListView"
        android:layout_width="fill_parent"
        android:layout_height="wrap_content" >

    </ListView>

</LinearLayout>
Lastly we need to design and create the custom ListView template we want to use. The technique for creating a custom ListView is fairly simple but can be intimidating. The process is:
- Design a single row item with an layout XML file
- Create an “adapter” that defines how incoming data maps to your design from step 1
- Feed data into the adapter
Create a new xml file. I called mine adapter_log.xml since its an adapter and its for the log file. Here’s the design I chose:

Custom ListView Adapter Layout – adapter_log.xml
<?xml version="1.0" encoding="utf-8"?>
<RelativeLayout xmlns:android="http://schemas.android.com/apk/res/android"
    android:layout_width="match_parent"
    android:layout_height="wrap_content"
    android:background="#E2E2E2"
    android:paddingLeft="10dp"
    android:paddingRight="2dp" >

    <RelativeLayout
        android:layout_width="match_parent"
        android:layout_height="wrap_content"
        android:background="#FFFFFF"
        android:padding="7dp" >

        <ImageView
            android:id="@+id/imageView"
            android:layout_width="wrap_content"
            android:layout_height="wrap_content"
            android:layout_alignParentLeft="true"
            android:layout_alignParentTop="true"
            android:layout_marginRight="25dp"
            android:src="@drawable/ic_launcher" />

        <TextView
            android:id="@+id/titleTextView"
            android:layout_width="wrap_content"
            android:layout_height="wrap_content"
            android:layout_alignTop="@+id/imageView"
            android:layout_toRightOf="@+id/imageView"
            android:text="Medium Text"
            android:textAppearance="?android:attr/textAppearanceMedium" />

        <TextView
            android:id="@+id/descriptionTextView"
            android:layout_width="wrap_content"
            android:layout_height="wrap_content"
            android:layout_alignBottom="@+id/imageView"
            android:layout_alignLeft="@+id/titleTextView"
            android:text="Small Text"
            android:textAppearance="?android:attr/textAppearanceSmall" />
    </RelativeLayout>

</RelativeLayout>
Note that in order to create the appearance of a thick right border I created a Relative layout with a grey background, then created a new Relative layout inside with a white background and gave the grey layout padding. Another important part is that the highest parent height is set to “wrap_content” that way it’s only as tall as the stuff inside it.
All done with layouts. Time to do some code.
Code
The Home Screen – MainActivity.java
package com.kanzelmeyer.json;

import java.io.BufferedReader;
import java.io.FileInputStream;
import java.io.FileOutputStream;
import java.io.IOException;
import java.io.InputStreamReader;
import java.text.DateFormat;
import java.util.Date;

import org.json.JSONArray;
import org.json.JSONException;
import org.json.JSONObject;

import android.os.Bundle;
import android.app.Activity;
import android.content.Context;
import android.content.Intent;
import android.view.Menu;
import android.view.View;
import android.widget.Toast;

public class MainActivity extends Activity {

	@Override
	protected void onCreate(Bundle savedInstanceState) {
		super.onCreate(savedInstanceState);
		setContentView(R.layout.activity_main);
	}

	@Override
	public boolean onCreateOptionsMenu(Menu menu) {
		// Inflate the menu; this adds items to the action bar if it is present.
		getMenuInflater().inflate(R.menu.main, menu);
		return true;
	}

	// Click Listener for the buttons on the main screen

	public void clickListener(View v) {

		switch (v.getId()) {

		case R.id.button_log:
			logDateTime();
			break;

		case R.id.button_view_log:
			Intent viewLog = new Intent(this, LogActivity.class);
			startActivity(viewLog);
			break;

		default:
			break;
		}
	}


	private void logDateTime() {

		// Variables
                String FILENAME = "log.json";
		String date = DateFormat.getDateInstance().format(new Date());
		String time = DateFormat.getTimeInstance().format(new Date());
		String desc = "Entry Created";
		JSONArray completeArray = new JSONArray();

		// Get the current JSON object from the file. The goal is to get the
		// entire contents of the JSON file (which is a JSON array), convert it
		// to a JSON array, add a new entry object, convert the new JSON object
		// to a string, then overwrite the JSON file with the new JSON array

		try {
			// Open the JSON file and initialize a string builder
			FileInputStream in = openFileInput(FILENAME);
			InputStreamReader inputStreamReader = new InputStreamReader(in);
			BufferedReader bufferedReader = new BufferedReader(
					inputStreamReader);
			StringBuilder sb = new StringBuilder();
			String line;
			// Read the existing content in the JSON file and add it to the
			// string builder
			while ((line = bufferedReader.readLine()) != null) {
				sb.append(line);
			}

			 // If the string builder is not empty (ie, the file was not empty),
			 // we convert the contents to a JSON array and store it in a local
			 // variable

			if (sb.toString() != "") {
				JSONArray temp_arr = new JSONArray(sb.toString());
				completeArray = temp_arr;
			}

		} catch (IOException e) {
			e.printStackTrace();
		}

		catch (JSONException e) {
			e.printStackTrace();
		}

		// Initialize the JSON object for the new entry
		JSONObject entry = new JSONObject();
		// Initialize the JSON object that will contain the entry object
		JSONObject finalEntry = new JSONObject();

		try {
			// Add the time and date to the entry object
			entry.put("date", date);
			entry.put("time", time);
			entry.put("description", desc);
			// Add the entry object to a new object called "entry"
			finalEntry.put("entry", entry);

			 // Finally add the completed "entry" object into the array that was
			 // parsed from the JSON file. If the file was empty this entry will
			 // be the first object in the array. If the file was not empty this
			 // entry will be added to the end of the array

			completeArray.put(finalEntry);

			// Convert the complete array in to a string
			String jsonEntry = completeArray.toString();

			// Write complete array to the file
			FileOutputStream fos = openFileOutput(FILENAME,
					Context.MODE_PRIVATE);
			fos.write(jsonEntry.getBytes());
			fos.close();
			// Notify that an entry has been created
			Toast toast = Toast.makeText(getApplicationContext(),
					"Entry Created", Toast.LENGTH_LONG);
			toast.show();
		}

		catch (JSONException e) {
			e.printStackTrace();
		}

		catch (IOException e) {
			e.printStackTrace();
		}
	}
}
MainActivity can be divided into three basic sections:
1. onCreate
Not very interesting – it just sets the view to the correct layout file.
2. Button Click Handler – clickListener()
In my opinion the cleanest and most intuitive technique for handling button clicks is to use a common click handler function. This click listener uses a Switch statement to handle the different buttons. Each button ID gets a case. Here is the function. It is placed inside the MainActivity class.
	// Click Listener for the buttons on the main screen
	public void clickListener(View v) {

		switch (v.getId()) {

		case R.id.button_log:
			logDateTime();
			break;

		case R.id.button_view_log:
			Intent viewLog = new Intent(this, LogActivity.class);
			startActivity(viewLog);
			break;

		default:
			break;
		}
	}
3. JSON Management – logDateTime()
Create a local file
If you look up the reference code for storing a local file from the Android Developer site you’ll find an example for creating and appending a locally stored file. That’s okay for a simple example but in our case we actually don’t want to append a local file. We want to overwrite it each time a new JSON object is added. The complete process is:
- Create a local file if it doesn’t exist
- Read the local file and convert it to a JSON Array
- Add a new entry to the JSON Array
- Overwrite the local file with the updated JSON Array
First define variables:
	String FILENAME = "log.json";
	String date = DateFormat.getDateInstance().format(new Date()); // <-- Gets the current date
	String time = DateFormat.getTimeInstance().format(new Date()); // <-- Gets the current time
	String desc = "Entry Created"; // Arbitrary description
	JSONArray completeArray = new JSONArray();
Next we want to open the JSON file and read the contents. If the file is empty we can move on to creating the JSON Array. If the file is not empty we need to read the contents, convert it to a string, then convert the string into a JSON Array:
		try {
			// Open the JSON file and initialize a string builder
			FileInputStream in = openFileInput(FILENAME);
			InputStreamReader inputStreamReader = new InputStreamReader(in);
			BufferedReader bufferedReader = new BufferedReader(
					inputStreamReader);
			StringBuilder sb = new StringBuilder();
			String line;
			// Read the existing content in the JSON file and add it to the
			// string builder
			while ((line = bufferedReader.readLine()) != null) {
				sb.append(line);
			}

			 // If the string builder is not empty (ie, the file was not empty),
			 // we convert the contents to a JSON array and store it in a local
			 // variable

			if (sb.toString() != "") {
				JSONArray temp_arr = new JSONArray(sb.toString());
				completeArray = temp_arr;
			}

		} catch (IOException e) {
			e.printStackTrace();
		}

		catch (JSONException e) {
			e.printStackTrace();
		}
Again the whole purpose of the above code is to use the existing JSON array if one exists. If the file is empty then the array initialized with the variables will still be empty.
Finally we want to create a new JSON object to store the date, time, and description. Then we give the JSON object a name and add it the JSON Array. Lastly we convert the updated JSON Array into a string, overwrite the local file with the updated Array, and notify the user that an entry has been created:
		// Initialize the JSON object for the new entry
		JSONObject entry = new JSONObject();
		// Initialize the JSON object that will contain the entry object
		JSONObject finalEntry = new JSONObject();

		try {
			// Add the time and date to the entry object
			entry.put("date", date);
			entry.put("time", time);
			entry.put("description", desc);
			// Add the entry object to a new object called "entry"
			finalEntry.put("entry", entry);

			 // Finally add the completed "entry" object into the array that was
			 // parsed from the JSON file. If the file was empty this entry will
			 // be the first object in the array. If the file was not empty this
			 // entry will be added to the end of the array

			completeArray.put(finalEntry);

			// Convert the complete array in to a string
			String jsonEntry = completeArray.toString();

			// Write complete array to the file
			FileOutputStream fos = openFileOutput(FILENAME,
					Context.MODE_PRIVATE);
			fos.write(jsonEntry.getBytes());
			fos.close();
			// Notify that an entry has been created
			Toast toast = Toast.makeText(getApplicationContext(),
					"Entry Created", Toast.LENGTH_LONG);
			toast.show();
		}

		catch (JSONException e) {
			e.printStackTrace();
		}

		catch (IOException e) {
			e.printStackTrace();
		}
That’s it for encoding our JSON data. Now each time the button is clicked an entry is added to the current array, then the updated array overwrites the old one. Using this method we maintain a file containing one JSON Array with an object for each entry (representing each button click).
Entry class – Entry.java
Now we want to create a Java class with the same structure as our JSON data. We’ll need this class in order to easily build a list of entries that we can pass into our ListView.
public class Entry {
	public String date;
	public String time;
	public String description;

	// -------------- SET METHONDS --------------

	public void setDate(String str) {
		this.date = str;
	}
	public void setTime(String str) {
		this.time = str;
	}
	public void setDescription(String str) {
		this.description = str;
	}

	// -------------- GET METHONDS --------------

	public String getDate() {
		return this.date;
	}
	public String getTime() {
		return this.time;
	}
	public String getDescription() {
		return this.description;
	}

}
ListView Adapter – LogAdapter.java
This section is probably the most challenging to understand. I’ve done my best to make it as easy as possible. Here is the complete code.
import java.util.List;
import android.content.Context;
import android.view.LayoutInflater;
import android.view.View;
import android.view.ViewGroup;
import android.widget.BaseAdapter;
import android.widget.TextView;

public class LogAdapter extends BaseAdapter {

	protected Context _context;
	List<Entry> entryList;

	public LogAdapter(Context context, List<Entry> eList){
		_context = context;
		entryList = eList;
	}


	@Override
	public int getCount() {
		return entryList.size();
	}

	@Override
	public Object getItem(int arg0) {
		return entryList.get(arg0);
	}

	@Override
	public long getItemId(int arg0) {
		return arg0;
	}

	@Override
	public View getView(int arg0, View arg1, ViewGroup arg2) {

		if (arg1 == null) {
			LayoutInflater mInflater = (LayoutInflater) _context
					.getSystemService(Context.LAYOUT_INFLATER_SERVICE);
			arg1 = mInflater.inflate(R.layout.adapter_log, null);
		}

		TextView title = (TextView) arg1.findViewById(R.id.titleTextView);
		TextView desc = (TextView) arg1.findViewById(R.id.descriptionTextView);

		Entry entry = entryList.get(arg0);

		title.setText(entry.description);
		desc.setText(entry.date + " at " + entry.time);

		return arg1;
	}

}
When you create a new class and add “extends BaseAdapter” Eclipse will automatically detect that you need some “stuff” in your class and add it for you. Below is what you will see (I called my class LogAdapter.java”
import android.view.View;
import android.view.ViewGroup;
import android.widget.BaseAdapter;

public class LogAdapter extends BaseAdapter{

	@Override
	public int getCount() {
		// TODO Auto-generated method stub
		return 0;
	}

	@Override
	public Object getItem(int arg0) {
		// TODO Auto-generated method stub
		return null;
	}

	@Override
	public long getItemId(int arg0) {
		// TODO Auto-generated method stub
		return 0;
	}

	@Override
	public View getView(int arg0, View arg1, ViewGroup arg2) {
		// TODO Auto-generated method stub
		return null;
	}

}
To make functions easier to use we should pass our class a Context and a List. I’ll explain the list in detail later. For now just know that we should pass it into the class. Add the following code to your class.
	protected Context _context;
	List<Entry> entryList;

	public LogAdapter(Context context, List<Entry> eList){
		_context = context;
		entryList = eList;
	}
The only really interesting part of the list adapter is in the fourth method called getView. Here is where you “map” the input data to the parts of the layout you created earlier:
if (arg1 == null) {
			LayoutInflater mInflater = (LayoutInflater) _context
					.getSystemService(Context.LAYOUT_INFLATER_SERVICE);
			arg1 = mInflater.inflate(R.layout.adapter_log, null); // <-- replace the ID with the ID of your adapter layout you created earlier
		}

                // Initialize variables and point them to the appropriate element of your adapter layout
		TextView title = (TextView) arg1.findViewById(R.id.titleTextView);
		TextView desc = (TextView) arg1.findViewById(R.id.descriptionTextView);

                // Get the element of the list you passed into the function and convert it to an Entry object
		Entry entry = entryList.get(arg0);

                // Map the fields of the object to the correct element of your layout
		title.setText(entry.description);
		desc.setText(entry.date + " at " + entry.time);

                // Done
		return arg1;
Finally – View the JSON log as a ListView – LogActivity.java
Almost done, I promise. The only thing left to do is to populate a ListView with the JSON data. Here is the code:
package com.kanzelmeyer.json;

import java.io.BufferedReader;
import java.io.FileInputStream;
import java.io.FileNotFoundException;
import java.io.FileOutputStream;
import java.io.IOException;
import java.io.InputStreamReader;
import java.util.ArrayList;
import java.util.List;
import org.json.JSONArray;
import org.json.JSONException;
import org.json.JSONObject;
import android.os.Bundle;
import android.app.Activity;
import android.app.AlertDialog;
import android.view.Menu;
import android.view.MenuItem;
import android.widget.ListView;
import android.widget.Toast;
import android.support.v4.app.NavUtils;
import android.annotation.TargetApi;
import android.content.DialogInterface;
import android.content.Intent;
import android.os.Build;

public class LogActivity extends Activity {


	final String FILENAME = "log.json";
	LogAdapter adapter;

	@Override
	protected void onCreate(Bundle savedInstanceState) {
		super.onCreate(savedInstanceState);
		setContentView(R.layout.activity_log);

		// Show the Up button in the action bar.
		setupActionBar();

		// Create an entry class list from the log file
		List<Entry> entryList = getLogList();

		// Pass the context and Entry object list to the list view adapter
		LogAdapter adapter = new LogAdapter(this, entryList);

		// Populate the list view with the custom adapter
		ListView logView = (ListView) findViewById(R.id.logListView);
		logView.setAdapter(adapter);

	}

	public List<Entry> getLogList() {

		// Initialize a list of Entry objects
		List<Entry> entryList = new ArrayList<Entry>();

		try {
			// Open the file and parse it into a string builder
			FileInputStream in = openFileInput(FILENAME);
			InputStreamReader inputStreamReader = new InputStreamReader(in);
			BufferedReader bufferedReader = new BufferedReader(
					inputStreamReader);
			StringBuilder sb = new StringBuilder();
			String line;

			while ((line = bufferedReader.readLine()) != null) {
				sb.append(line);
			}

			// Convert the string builder into a JSON array
			JSONArray completeArray = new JSONArray(sb.toString());

			// Initialize some temporary variables to store the data
			// we want from the JSON objects
			String logDate, logTime, logDesc;

			 // Iterate through the JSON array, store each object in a
			 // temporary object, create an entry object from the temporary
			 // object, then add the Entry object to the Entry object list

			for (int i = 0; i < completeArray.length(); i++) {

				JSONObject dummyObj = completeArray.getJSONObject(i);
				// Get the object called 'entry'
				JSONObject tempObj = dummyObj.getJSONObject("entry");

				logDate = tempObj.getString("date");
				logTime = tempObj.getString("time");
				logDesc = tempObj.getString("description");

				// Create an entry objects (entryObj)
				Entry entryObj = new Entry();
				entryObj.date = logDate;
				entryObj.time = logTime;
				entryObj.description = logDesc;
				// Add the entry object to the list
				entryList.add(entryObj);
			}

		} catch (IOException e) {
			e.printStackTrace();
		}

		catch (JSONException e) {
			e.printStackTrace();
		}

		// Return the entry list that contains an entry object for each entry in the
		// JSON array from the JSON log file
		return entryList;

	}


	 // Set up the {@link android.app.ActionBar}, if the API is available.

	@TargetApi(Build.VERSION_CODES.HONEYCOMB)
	private void setupActionBar() {
		if (Build.VERSION.SDK_INT >= Build.VERSION_CODES.HONEYCOMB) {
			getActionBar().setDisplayHomeAsUpEnabled(true);
		}
	}

	@Override
	public boolean onCreateOptionsMenu(Menu menu) {
		// Inflate the menu; this adds items to the action bar if it is present.
		getMenuInflater().inflate(R.menu.log, menu);
		return true;
	}

	@Override
	public boolean onOptionsItemSelected(MenuItem item) {
		switch (item.getItemId()) {
		case android.R.id.home:
			// This ID represents the Home or Up button. In the case of this
			// activity, the Up button is shown. Use NavUtils to allow users
			// to navigate up one level in the application structure. For
			// more details, see the Navigation pattern on Android Design:
			//
			// http://developer.android.com/design/patterns/navigation.html#up-vs-back
			//
			NavUtils.navigateUpFromSameTask(this);
			return true;

		case R.id.clear_log:
			// Dialog box to confirm the delete log action
			new AlertDialog.Builder(this)
			.setTitle(R.string.clear_log)
			.setMessage("Do you really want to delete all log entries?")
			.setIcon(android.R.drawable.ic_dialog_alert)
			.setPositiveButton(android.R.string.yes, new DialogInterface.OnClickListener() {

			    public void onClick(DialogInterface dialog, int whichButton) {
			    	clearLog();
			    	Intent it = new Intent(LogActivity.this, MainActivity.class);
                    it.addFlags(Intent.FLAG_ACTIVITY_CLEAR_TOP);
                    startActivity(it);
			    }
				})
			 .setNegativeButton(android.R.string.no, null).show();
			break;

		case R.id.action_settings:
			break;

		}
		return super.onOptionsItemSelected(item);
	}

	private void clearLog() {
		// Blank string that we will write to the File
		String clear = "";

		// Open the file in MODE_PRIVATE which will allow us to overwrite the file

		try {
			// Write the blank string to the file
			FileOutputStream fos = openFileOutput(FILENAME, MODE_PRIVATE);
			fos.write(clear.getBytes());
			fos.close();

			// Notify the user that the log was cleared
			Toast toast = Toast.makeText(getApplicationContext(),
					"Log Cleared", Toast.LENGTH_LONG);
			toast.show();

		} catch (FileNotFoundException e) {
			e.printStackTrace();
		} catch (IOException e) {
			e.printStackTrace();
		}
	}
}
It seems like a lot but there are basically just three chunks:
1. onCreate
Here is where we initialize the List that we need to pass to our Adapter, call the Adapter, then populate the ListView with our custom adapter. Initializing the list is where we use the JSON data. Its the lion’s share of the work in this class. As an added bonus there is also a menu with a Clear Log option. When you click “Clear Log” it prompts the user to confirm his request. If confirmed the JSON file is cleared and the user is sent back to the home screen.
	protected void onCreate(Bundle savedInstanceState) {
		super.onCreate(savedInstanceState);
		setContentView(R.layout.activity_log);

		// Show the Up button in the action bar.
		setupActionBar();

		// Create an entry class list from the log file
		List<Entry> entryList = getLogList();

		// Pass the context and Entry object list to the list view adapter
		LogAdapter adapter = new LogAdapter(this, entryList);

		// Populate the list view with the custom adapter
		ListView logView = (ListView) findViewById(R.id.logListView);
		logView.setAdapter(adapter);

	}
Use the JSON data – getLogList()
This function is the real workhorse of this class. It reads the JSON file that we created on the main page and converts it to a list of Entry objects as defined by our Entry class. The process is:
- Read the JSON file and convert it to a string
- Convert the string to a JSON Array
- Iterate through the JSON Array and build an Entry object for each object in the JSON Array
- Add each Entry object to a list of Entry objects
- Return the complete List of Entry objects
	public List<Entry> getLogList() {

		// Initialize a list of Entry objects
		List<Entry> entryList = new ArrayList<Entry>();

		try {
			// Open the file and parse it into a string builder
			FileInputStream in = openFileInput(FILENAME);
			InputStreamReader inputStreamReader = new InputStreamReader(in);
			BufferedReader bufferedReader = new BufferedReader(
					inputStreamReader);
			StringBuilder sb = new StringBuilder();
			String line;

			while ((line = bufferedReader.readLine()) != null) {
				sb.append(line);
			}

			// Convert the string builder into a JSON array
			JSONArray completeArray = new JSONArray(sb.toString());

			// Initialize some temporary variables to store the data
			// we want from the JSON objects
			String logDate, logTime, logDesc;

			// Iterate through the JSON array, store each object in a
			// temporary object, create an entry object from the temporary
			// object, then add the Entry object to the Entry object list

			for (int i = 0; i < completeArray.length(); i++) {

				JSONObject dummyObj = completeArray.getJSONObject(i);
				// Get the object called 'entry'
				JSONObject tempObj = dummyObj.getJSONObject("entry");

                                // Store the JSON values in temporary variables
				logDate = tempObj.getString("date");
				logTime = tempObj.getString("time");
				logDesc = tempObj.getString("description");

				// Create an entry objects (entryObj) with the JSON values
				Entry entryObj = new Entry();
				entryObj.date = logDate;
				entryObj.time = logTime;
				entryObj.description = logDesc;
				// Add the entry object to the list
				entryList.add(entryObj);
			}

		} catch (IOException e) {
			e.printStackTrace();
		}

		catch (JSONException e) {
			e.printStackTrace();
		}

		// Return the entry list that contains an entry object for each entry in the
		// JSON array from the JSON log file
		return entryList;

	}
3. Menu stuff (optional)
I’ve created a simple menu option that clears log. To set up this menu first create a menu for this page. Menus are xml files stored in res/menu. Below is the menu I’ve created.
log.xml
<menu xmlns:android="http://schemas.android.com/apk/res/android" >
    <item
        android:id="@+id/clear_log"
        android:showAsAction="never"
        android:title="@string/clear_log"/>
    <item
        android:id="@+id/action_settings"
        android:orderInCategory="100"
        android:showAsAction="never"
        android:title="@string/action_settings"/>
</menu>
Now we just need to implement the menu and define what to do with each option. The click handler for the menu is similar to the click handler we created for the buttons. The case for the home button was automatically generated by the Android SDK because when I created the LogActivity class I specified that the parent was MainActivity, therefore it adds the back button functionality for SDK versions that support it. The case for the clear_log option is intended to erase the contents of the JSON file. Since erasing a file is a permanent operation I think its appropriate to confirm the action with user before acting. So the function uses a dialog box to prompt the user to confirm his choice. If the choice is confirmed the clearLog() function is called and the user is “redirected” to the home screen.
	@Override
	public boolean onOptionsItemSelected(MenuItem item) {
		switch (item.getItemId()) {
		case android.R.id.home:
			// This ID represents the Home or Up button. In the case of this
			// activity, the Up button is shown. Use NavUtils to allow users
			// to navigate up one level in the application structure. For
			// more details, see the Navigation pattern on Android Design:
			//
			// http://developer.android.com/design/patterns/navigation.html#up-vs-back
			//
			NavUtils.navigateUpFromSameTask(this);
			return true;

		case R.id.clear_log:
			// Dialog box to confirm the delete log action
			new AlertDialog.Builder(this)
			.setTitle(R.string.clear_log)
			.setMessage("Do you really want to delete all log entries?")
			.setIcon(android.R.drawable.ic_dialog_alert)
			.setPositiveButton(android.R.string.yes, new DialogInterface.OnClickListener() {

			    public void onClick(DialogInterface dialog, int whichButton) {
			    	clearLog();
			    	Intent it = new Intent(LogActivity.this, MainActivity.class);
                    it.addFlags(Intent.FLAG_ACTIVITY_CLEAR_TOP);
                    startActivity(it);
			    }

				})
			 .setNegativeButton(android.R.string.no, null).show();


			break;

		case R.id.action_settings:
			break;

		}
		return super.onOptionsItemSelected(item);
	}
The clearLog() function simply overwrites the JSON file with a blank string and notifies the user that the log has been cleared:
	private void clearLog() {
		// Blank string that we will write to the File
		String clear = "";
		// Open the file in MODE_PRIVATE which will allow us to overwrite
		// the file

		try {
			// Write the blank string to the file
			FileOutputStream fos = openFileOutput(FILENAME, MODE_PRIVATE);
			fos.write(clear.getBytes());
			fos.close();

			// Notify the user that the log was cleared
			Toast toast = Toast.makeText(getApplicationContext(),
					"Log Cleared", Toast.LENGTH_LONG);
			toast.show();

		} catch (FileNotFoundException e) {
			e.printStackTrace();
		} catch (IOException e) {
			e.printStackTrace();
		}

	}
That’s it! Give it a test drive!
